
 CX Genie
Support Ticket System Setup, The Copy-Paste Blueprint for Fields, SLAs, and Routing Rules
Launch a support ticket system setup with copy-paste fields, statuses, SLAs, routing rules, and a shared-inbox migration plan.
Support ticket system setup works best when you copy a proven workflow blueprint, then configure your fields, statuses, SLAs, routing, and permissions in that exact order so tickets flow cleanly from intake to resolution.
- Define intake, ownership, handoffs, and success metrics before you touch automations, or you will automate chaos.
- Use two copy-paste intake templates (Customer Support and IT) so your team collects the minimum information needed to route and resolve fast.
- Keep the first rollout enforceable: 5-7 statuses, a simple impact-urgency SLA matrix, and routing rules that prevent bottlenecks.
Start With The Workflow, Not The Tool
A support ticket system setup succeeds when you define the workflow map first (intake → triage → work → handoff → resolution), then configure the tool to enforce it. If you start inside software, you tend to create dozens of fields and statuses that no one follows, and reporting becomes noise.
Workflow map you can paste into a runbook
- Intake: Where tickets enter (email, chat, form, portal). Output: one ticket with the right category and requester.
- Triage (0-15 minutes for new tickets during business hours): Confirm it is actionable, dedupe, set impact/urgency, assign owner or queue.
- Work: Agent diagnoses, requests info, and executes fix or next action.
- Handoff: Escalate to tier 2, engineering, IT infra, billing, or a manager.
- Resolution: Confirm fix, document outcome, send closure message, and tag for reporting and knowledge base updates.
Define ownership and handoffs in one page
Write these four rules in plain language and you will avoid 80% of shared-inbox confusion:
- Single accountable owner: every ticket has exactly one owner at a time.
- Queues are for unowned work: queues represent “waiting for assignment,” not “someone is kind of working on it.”
- Handoff includes a summary: every escalation must include “what we tried,” “current hypothesis,” and “next action needed.”
- Requester updates are scheduled: define when customers/users get updates so agents do not spam or go silent.
Pick success metrics you can actually measure on day 1
Choose 3 metrics and write the exact definition so reporting is consistent:
- First response time (FRT): time from ticket creation to first human response (exclude auto-replies).
- Time to resolve: time from creation to “Resolved” status (exclude “Waiting on requester” if you use that status).
- Reopen rate: % of resolved tickets reopened within 7 days (quality signal).
After running shared-inbox cleanups for multiple teams, the pattern was clear: if “owner” and “first response time” are not defined precisely, every weekly report becomes a debate instead of a decision.
Use Copy-Paste Intake Fields For Customer Support And IT
Support ticket system setup gets dramatically faster when you standardize intake fields so routing and SLAs can be applied automatically. The goal is not “collect everything,” it is “collect the minimum needed to classify, route, and act without a back-and-forth.”
Customer Support intake form template (copy-paste)
Use this set for product support, billing, and after-sale customer service:
- Requester email (required, validated)
- Customer name (optional if pulled from CRM)
- Company (required for B2B, optional for B2C)
- Plan / contract tier (dropdown: Free, Trial, Pro, Business, Enterprise)
- Category (dropdown, required): Login/Access, Billing, Bug, Feature request, How-to, Account change, Other
- Product area (dropdown): Onboarding, Integrations, Automation, Analytics, Knowledge base, Other
- Severity (customer-facing) (dropdown): Can’t use product, Major degradation, Minor issue, Question
- Order / invoice / subscription ID (text, conditional required if Category = Billing)
- Steps to reproduce (textarea, conditional required if Category = Bug)
- Expected outcome (textarea)
- Actual outcome (textarea)
- Screenshots / attachments (optional)
- Consent to access account (checkbox if you may inspect user data)
IT / internal service desk intake template (copy-paste)
Use this for access requests, device issues, and internal systems:
- Requester (auto from SSO if possible)
- Department (dropdown): Sales, Support, Engineering, Finance, HR, Operations
- Location (dropdown or free text)
- Request type (dropdown, required): Access, Hardware, Software, Network/VPN, Security, New hire/offboarding, Other
- System / application (dropdown): Google Workspace, Slack, GitHub, VPN, CRM, Payroll, Other
- Business impact (dropdown): Whole department blocked, Multiple people blocked, Single person blocked, Low impact
- Urgency (dropdown): Immediate, Today, This week, Whenever
- Manager approval (checkbox or approver field, required for Access type)
- Asset tag / device ID (text, conditional for Hardware)
- Best contact method (dropdown): Slack, Email, Phone
- Preferred time window (text)
Intake field rules that keep the system clean
- Make dropdowns narrow: 6-10 options max per field so tagging stays consistent.
- Use conditional required fields: only force details when the category demands it (billing ID, device ID, repro steps).
- Separate impact and urgency: people over-report urgency; impact grounds the SLA in reality.
If you are still choosing software, use your field list as the test: can the platform enforce conditional required fields, and can you report by Category and Product area without manual tagging? For a deeper selection framework, see support ticket management software.
Support ticket system setup for statuses, priorities, and SLAs that match real work
Support ticket system setup should start with a small, enforceable status model and an impact-urgency SLA matrix, because agents cannot follow what they cannot remember. You can always add nuance later, but removing statuses after launch is painful because it breaks reporting and habits.
A practical status model (7 statuses)
- New: created, not yet triaged
- Triaged: categorized, impact and urgency set, next action identified
- In progress: actively being worked
- Waiting on requester: blocked by missing info from customer/user
- Waiting on internal: blocked by another team (engineering, finance, vendor)
- Resolved: fix delivered, awaiting confirmation or within auto-close window
- Closed: final state (manual or auto-close after N days)
Priority calculation: impact + urgency (not “gut feel”)
Define priority as a function, not a label people argue about:
- Impact = how many users/customers are affected and how critical the function is.
- Urgency = how fast the impact becomes unacceptable (deadline, outage, compliance).
Copy-paste SLA matrix you can enforce
Use response and resolution targets that reflect staffing reality. If you cannot meet the target with today’s team, the SLA becomes a broken promise and agents will stop caring.
| Impact | Urgency | Priority | First response target | Resolution target |
|---|---|---|---|---|
| High (many affected / revenue risk) | Immediate | P1 | 15 min (business hours) | 4 hours or workaround |
| High | Today | P2 | 1 hour | 1 business day |
| Medium (single team / key user) | Today | P3 | 4 hours | 3 business days |
| Low (how-to / minor bug) | This week | P4 | 1 business day | 5 business days |
Auto-close rule that avoids “ghost tickets”
- Resolved → Closed after 5-7 days if requester does not respond.
- Waiting on requester auto-nudge at day 2 and day 5 with a single-click “still need help” option.
We initially assumed adding more granular statuses would improve reporting, but audits of real queues showed the opposite: agents misused similar statuses, and the time-to-resolve chart became less trustworthy.
Configure Routing, Escalation, And Permissions Without Creating Bottlenecks
Routing rules should reduce decision load for agents while keeping escalation paths explicit, because unclear ownership is the fastest way to recreate a shared inbox inside a ticketing tool. Start with 5-8 rules that cover 80% of volume, then iterate using misroutes and backlog data.
Routing rules you can implement first
- Category-based queues: Billing → Billing queue, Bug → Tier 2 queue, How-to → Tier 1 queue.
- VIP routing: if Plan = Enterprise (or a VIP tag), assign to senior agents or a dedicated queue.
- Language routing: if ticket language detected or selected, route to the right language-skilled group.
- Business-hours routing: after-hours tickets stay in “New” but trigger on-call only for P1/P2.
- Channel normalization: email, chat, and form all land in the same queues with the same fields populated.
Escalation path: define who can pull which lever
Write escalation as a permissioned action, not a vague request:
- Tier 1 agents can: re-categorize, set impact/urgency within bounds, request info, assign within Tier 1.
- Tier 2 agents can: change priority, escalate to engineering/IT infra, mark as known issue, trigger incident workflow.
- Managers can: override SLAs, reassign across teams, approve goodwill credits, change requester-facing templates.
Avoid the three common bottlenecks
- Manager-only assignment: if only one person can assign, the queue stalls. Use round-robin or skill-based auto-assignment.
- Overly strict permissions: if agents cannot reclassify, they work around it with wrong tags.
- Unlimited priority changes: if anyone can set anything to P1, your SLA becomes meaningless. Put bounds on who can set P1/P2.
For a quick clarity check on whether you are setting up an internal service workflow or customer support workflow, see service desk vs helpdesk.
Migrate From Shared Inbox To Tickets Without Losing History
A shared inbox migration works when you run email aliases in parallel, dedupe aggressively during the first week, and import only the history you will actually search. The objective is continuity for customers and a clean starting dataset for reporting.
Step-by-step migration plan (7 steps)
- Inventory inboxes and aliases: list every public support address, internal escalation alias, and forwarding rule.
- Create one canonical intake address: for example support@ and it-help@, then keep old aliases as forwards for 60-90 days.
- Set an auto-reply that does not lie: confirm receipt, share expected first response window, and include a link to the portal if you have one.
- Deduping rule: merge tickets with same requester + same subject within 24 hours, or use a “possible duplicate” tag for review.
- Historical import scope: import only the last 3-6 months of threads, plus any open/active items. Keep older email archived for compliance/search.
- Soft launch with internal users first: run IT tickets through the system for 1 week, then bring customer support live.
- Launch communication: 3 messages: internal announcement, external help-center update, and an email footer change that points to the new process.
What to do about “invisible work” hiding in inbox threads
Shared inboxes often contain work that never became a ticket, such as side conversations, approvals, or repeated bug reports. During week 1, assign one person 30 minutes per day to tag patterns: top 5 categories, top 5 missing fields, and top 5 misroutes. That short feedback loop is more valuable than designing the perfect system upfront.
If your team is unsure about the mechanics of how tickets are created and tracked across channels, this background explainer can help align terminology: what is ticketing system.
Choose A Free, Lightweight, Or Full-Scale Setup Path
The right support ticket system setup path depends on volume, compliance needs, and whether you must coordinate multiple teams, because “free” breaks down when you need audit trails, advanced routing, or reliable analytics. Use the decision table below to pick a minimum viable setup you can ship in days, not weeks.
Decision criteria to pick your setup tier
- Ticket volume: low volume can survive with manual triage; higher volume needs automation.
- Org complexity: multiple departments and handoffs require permissions and routing discipline.
- Risk: regulated data and access requests need auditability and role-based access.
- Support channels: email-only is simpler; omnichannel increases the need for consistent fields and routing.
Setup path comparison table
| Path | Best for | What you configure (minimum) | Tradeoffs | When to upgrade |
|---|---|---|---|---|
| Free / basic | Single team, low volume, email-first | 2 forms, 5-7 statuses, manual assignment, basic tags | Limited automation, reporting, and permissions | When misroutes or SLA misses become weekly |
| Lightweight paid | Growing support, basic SLAs, simple routing | SLA timers, 5-10 routing rules, canned replies, basic dashboards | May lack deep audit controls or advanced analytics | When you add departments or need stricter access control |
| Full-scale help desk | Multi-team ops, compliance, omnichannel, serious reporting | Role-based access, advanced automation, knowledge base, lifecycle analytics | More configuration effort, higher cost, admin overhead | When leadership needs reliable KPIs and cross-team workflows |
Buying-context guidance: what to validate in a demo
- Field enforcement: conditional required fields and dropdown governance.
- Automation clarity: can you simulate a ticket and see exactly why it was routed?
- Audit safety: role-based permissions and a log of changes (assignment, priority, status).
- Reporting trust: does the platform define FRT and resolution time in a way you can explain?
In our experience working with small IT teams, the fastest “break point” for free tiers is not volume, it is access control: once managers ask “who changed this priority” or “who viewed this ticket,” you need stronger permissions and audit trails.
If you are considering community or self-hosted routes, review the risk-first checklist in open source it helpdesk ticketing system.
See How CX Genie Implements This Setup In One Platform
CX teams can implement this blueprint faster when one platform handles omnichannel intake, routing automation, a searchable knowledge base, and reporting in the same workflow. The practical benefit is fewer integration seams, meaning fewer places where fields go missing and SLAs stop applying consistently.
Map the blueprint to a live configuration
- Intake: connect email and other channels so every request becomes a ticket with the same required fields.
- Routing: implement category, VIP, language, and business-hours rules so tickets land with the right owners quickly.
- Lifecycle tracking: use the status model and waiting states to keep metrics honest, especially around requester delays.
- Self-service: publish your most common resolutions in a portal to reduce repetitive tickets, and keep answers aligned with what agents actually resolve.
- Analytics: track agent performance and ticket lifecycle signals to spot where handoffs or categories create backlog.
What “good” looks like 2 weeks after launch
- Every ticket has an owner and a category, with fewer “Other” tags week over week.
- P1/P2 tickets follow a consistent escalation path, and “Waiting” statuses explain delays without hiding them.
- Top 10 ticket reasons are visible, so you can fix product issues or publish knowledge base articles.
If your workload includes both support and operational requests, also make sure you are not confusing “ticketing” with “online ticketing” for events; the distinction matters when evaluating vendors and integrations. This guide keeps the terms straight: online ticketing system.
| Setup artifact | Copy-paste starting point | Common mistake | Fix |
|---|---|---|---|
| Intake fields | Customer Support + IT templates | Free-text categories | Use dropdowns with 6-10 options |
| Status model | 7-status lifecycle | Too many “waiting” variants | Keep only requester vs internal waiting |
| SLA policy | Impact-urgency matrix | Setting targets you cannot staff | Start conservative, tighten after 2-4 weeks |
| Routing rules | 5-8 core rules | Manager-only assignment | Round-robin or skill-based assignment |
FAQ on support ticket system setup
How long does a support ticket system setup typically take?
A minimum viable setup can be configured in a few days if you limit scope to two intake forms, 5-7 statuses, a simple SLA matrix, and a small set of routing rules; the longer work is usually migration cleanup and team enablement.
What is the minimum number of ticket statuses I should start with?
Start with 5-7 statuses that cover the real lifecycle: New, Triaged, In progress, Waiting on requester, Waiting on internal, Resolved, Closed. More statuses usually reduce consistency and reporting trust in early weeks.
Should I migrate all shared inbox history into the ticketing system?
No. Import only what you will search and report on, commonly the last 3-6 months plus anything still open. Keep older email archived for compliance or reference without polluting your new dataset.
What should I validate during a demo before committing?
Validate conditional required fields, transparent automation and routing logic, role-based access with an audit trail, and reporting definitions for first response and resolution time. If the demo cannot show those clearly, scaling will be painful.
If you want to turn this support ticket system setup blueprint into a live workflow quickly, CX Genie can help you centralize omnichannel intake, apply automation and routing rules, and track performance end-to-end. Book a demo to map your exact fields, SLAs, and queues, then launch with confidence instead of iterating in production.
Read Next
View all
AI Chatbot Free Trial: Launch a Support Bot in 10 Minutes
Start an AI chatbot free trial to deflect tickets, capture leads, and measure ROI fast. Set up in under 10 minutes and scale to a team plan.
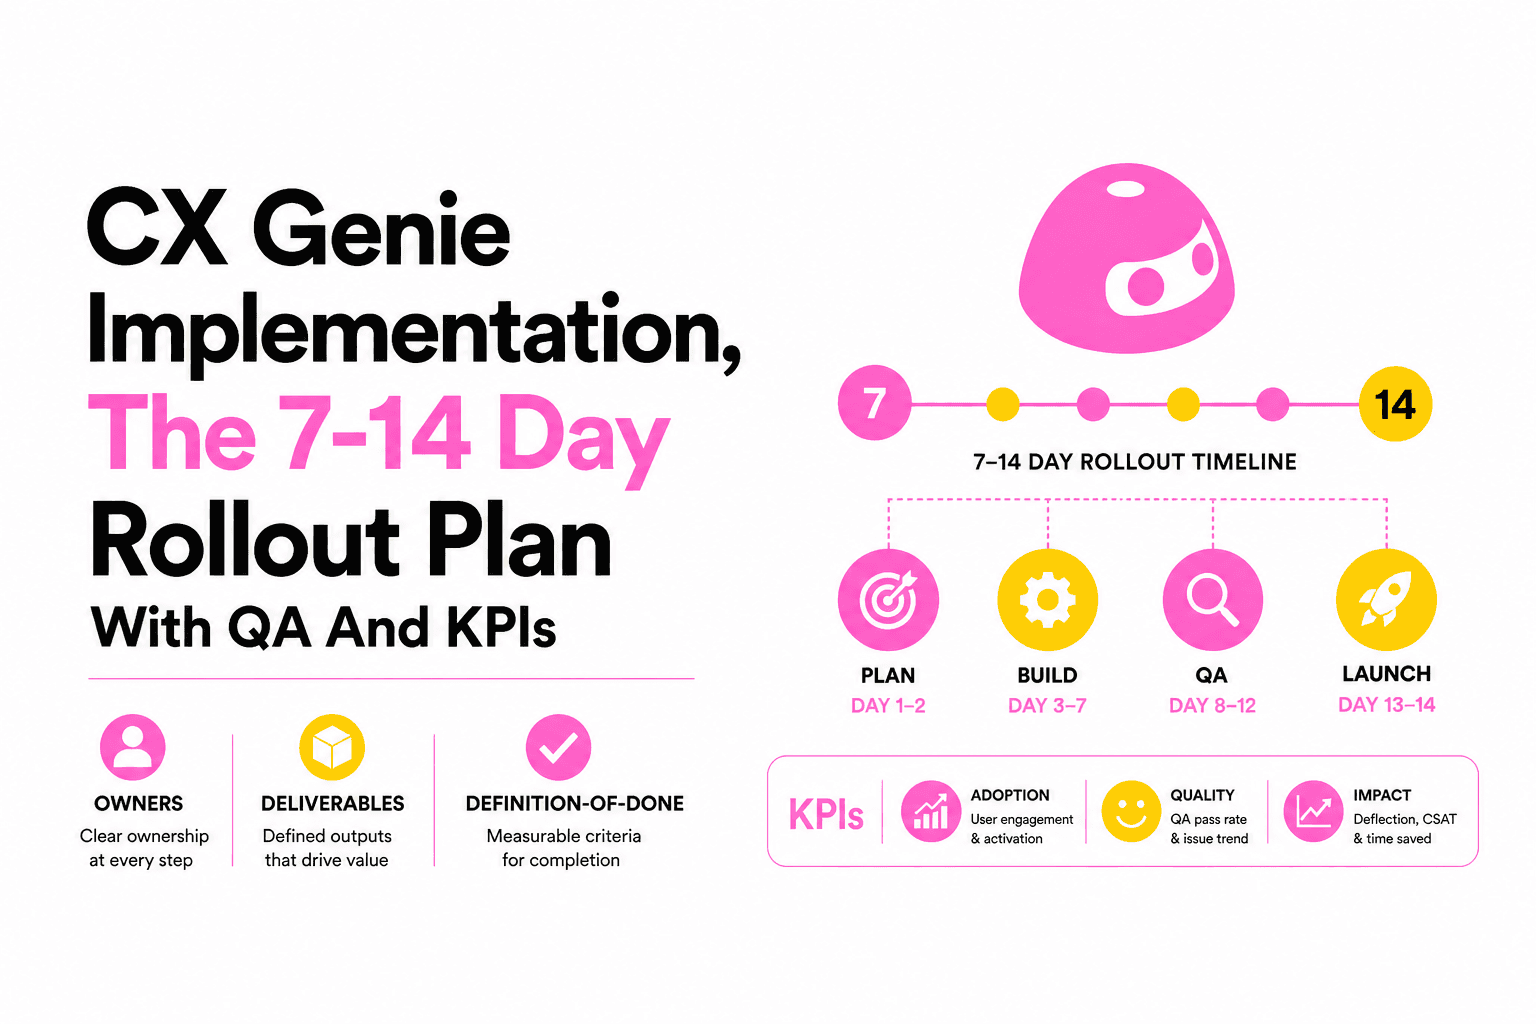
CX Genie Implementation, The 7-14 Day Rollout Plan With QA And KPIs
A practical cx genie implementation playbook: owners, knowledge onboarding, workflows, channel QA, and KPI gates to launch in 7-14 days.